Showing posts with label Family Organization. Show all posts

Tuesday, January 27, 2015

Purge, purge, purge!

I'm on a roll. I can't stop! Jerry thinks I'm on crack. Well not really, but he thinks I'm on something because I have been on this kick since this last weekend. I've been purging (and organizing) anything and everything I can get my hands on, a little at a time. The more I get done, the more I want to do....and it feels Great!


Purging can be very overwhelming, right? Where the heck do you start? You know that feeling when you open that messy drawer and you just go "Uggghh." You can't deal with looking at this space, but yet there is that absurd sense of like, 'well I know that what I need is in there somewhere, so whatever!'  Yeah, that feeling. But really, it was getting to the point that every drawer was turning into a "dump it drawer" and I am not having it this year. I am in the search of some control through letting go of as much CRAP as possible and the peace of keeping things looking simple and orderly. Something that is still hard to do when you are blessed to live with 4 boys/men(?) but a controlled version of this would be wonderful right now.

So this past week has been a non-stop daily attack of some space in my house. As I pull things out and before I consider keeping something useless, the words "purge, purge, purge" fly out of my mouth as verbal motivation to happily trash or give away. I have purged bathrooms, drawers, shelves, under the sink spaces, cabinets, you get the picture. I even spent 7 hours one night purging and rearranging my entire kitchen. The kitchen is my hub and I need things I use daily to be more accessible so all the pots/pans/appliances and more got rearranged as I tried to make better use of my kitchen space.

The fruits of my labor- 2 filled, above the rim garbage cans just from all the trash I pulled, and over 8 bags of old clothes, accessories, electronics and much more junk stuff to be given away. I have found things we thought were lost and could still use, and have found things that will never (ever) be used so bye-bye once and for all. Be gone, all of it!

I was on such a mission that I forgot to take before pictures, but trust me I'm saving you from the chaos, so lets just show you a few results of the after...


Its amazing to see how much space I have actually re-purposed and rearranged and in turn regained. Its not 100% magazine ready perfect, but its 100% better for me, for us. I have found spaces in my house that are now actually storing things they were meant to store and most things now have an appropriate place to go. And there is still more to go. (Keep posted this week for one of the funner projects I took on.)

I'm not sure where I am getting my drive from, but there is such a high that comes with purging..its like oxygen, the ability to breathe again, to think, to have clarity...its priceless. Using things now feels good, everything seems to work better, there are systems in place it feels like. I'm much more motivated to put things back where they belong because there's some where to do so now. More importantly, I've shown the guys what I've done so they too can help me keep things in order- fingers crossed! So I will continue to take advantage of it and do as much as I can before I fizzle out. Its wonderful to do, but heck...I've been working hard. I'm tired people...but its so worth it!

This "purge" has really aligned itself with my 'letting go' this year. I feel like I truly had to complete something as overwhelming like this now, in the first month of the year, before I could move on to to anything else I'd like to do in 2015.

I feel I now have permission to do what I really want to do...the fun stuff! I can't wait!

From my corner to yours...Happy purging!!


Monday, November 10, 2014

My travel favorites...

Well hello there! I haven't been back in a while I know, but I have been recently helping Chris get through this very stressful process called 'applying for college'...Uggh! I'll have some thoughts on all of that when its all done, but for now I wanted to get back to my blog. I missed writing, so as I've been reflecting back on our trip, (as long ago that seems to be now), I wanted to share some of my favorite accessories/tips/ideas that I specifically used and found to make our trip so much less stressful for many reasons.  I figured I was still in time to share these with those of you planning on traveling soon for the holidays or anytime thereafter for that reason.  I hope that you'll find these items helpful in your planning and traveling. Here they are:

Packing
Keeping in mind that we were going to be moving between 3 states, and basically live out of our suitcases, and in addition, wanting to avoid extra baggage fees, any unnecessary over packing was out of the question. So I did some research on the best possible way to pack just enough clothes, (the right kinds of clothes) for 5 people and for 8 days. We were also going to be doing a lot of walking, in humid areas, so packing needed to be practical and light- there was no room for cuteness and/or the latest fashions really.  Casual wear and tennis shoes were our calling. 


So I found this travel blog post that basically showed me how to pack up a few outfits at a time into rolls. An amazing piece of travel advice! I was able to pack up 2 pants, 2 shorts, 4 shirts and an extra pair of shoes for each of us into just 2 suitcases! With some extra room to boot and I minimized wrinkling. We each took a sweatshirt and carried that as necessary so it wouldn't overload the bags either. Loved it. Then because we made sure that our hotels had laundry services I also took a plastic container with Tide wash pods and a few dryer sheets so I could wash clothes between cities. I had done this on our Hawaii trip  a few years back and had worked well so I decided to try it again. We saved money by taking our own detergent stuff, and it helped me avoid bringing home a whole bunch of dirty (stinky) laundry too. I will continue to do both of these things on any and all trips because it made packing and traveling pretty much stress free.


Travel Photography
18 tips for photographing your family vacation photoMy research included getting information on travel photography, and I found this article by Juliette Fradin on one of my favorite photography blogs called clickinmoms.com. It was about picture taking on trips and I got inspired with ideas of the kinds of pictures I wanted to take on this trip.  It had some great ideas, but I have to say that because our trip was so go-go-go, I really didn't have a chance to think about or set up all the special shots as she suggested, but I still think it makes a good read for all the the great travel information it contained.

Camera bags
In this same article is where I also found my next two favorites. This photographer suggested two different bags for two different situations, but both happen to apply to me for this trip. So I decided to purchase both.


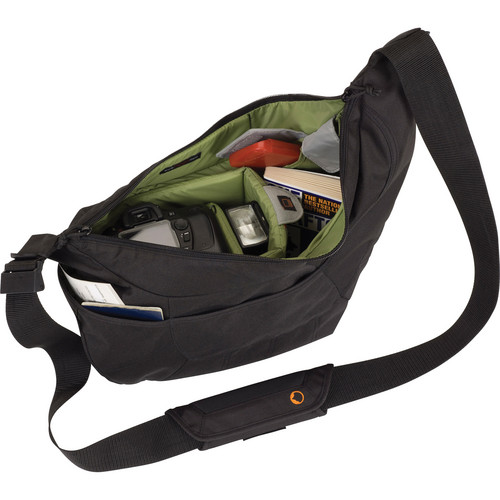
The Lowepro Sling bag-


Lowepro Passport Sling Camera Bag (Black)I had to get resourceful with everything we were taking including my purse and my camera bag. I had to avoid any additional pieces of luggage possible, so this bag became the perfect solution- it turned out to be my purse, my carry-on AND my camera bag for the entirety of the trip. It comes with a padded section for my camera but there was also extra room to carry my tickets, my phone, my travel book (see below), a magazine, a water bottle and even a light sweater once I opened up the zipper section. I carried it cross-body the whole time, and it occasionally would get heavy but I knew that I had everything with me at all times and no extra camera bag to carry. I found that Ebay carries them at the best price available and I got it delivered in less than 2 weeks.


Camera Coats
This was the other great suggestion I decided to
purchase not only for the purpose of this trip, but
http://www.cameracoats.com/because its a way to always protect my camera in a purse when I don't feel like carrying it around in a bulky camera bag and give myself a stylish flare at the same time. For this trip, it provided extra protection for my camera from those rainy days in Washington DC and for the boat trip to and from the Statue of Liberty. And even with this Camera Coat, it fit into the camera compartment of my Lowepro bag. They are a bit pricey, but I bought mine (the one pictured) because it was cute and it was on sale! I don't pay full price for anything f I can help it especially on a trip like this. That's how I roll. ;)


Travel Books
Midori style Travel books are apparently all the rage in agenda carrying nowadays. They are intended for travel journaling, but people are using them for all sorts of reasons- note taking, goal planning, an idea keeper, artwork etc. I was introduced to them by my SIL, and I'm always looking for a cute new way to keep my ideas and time schedule together so I decided to buy a "faux-dori" (a travel book that is similar to the actual Midori brand travel book for half the price). I figured it was the same idea and it would still be a leather covered journal as a way to keep a journal throughout our trip. I wasn't sure I'd do much with it, but I ended up having a great time keeping this up as the days went by. I used some scrapbooking skills to make its own little book, and used stickers, my Instamax pictures, and the memorabilia I gathered to decorate it. I took a small pencil case with some washi-tape, pens, scissors, a small ruler, and decorative extras to complete it. It was a project I happily worked on during our flights to and from and I would find a few minutes every night to journal. So as of right now, my trip is pretty much journaled in its own little notebook (an accomplishment in itself...Truly!) This was actually a great resource for me as I used to refer back to as I wrote my posts about the trips. They also come with 3 notebooks, so I still have 2 more inside my leather book to use for other things and I carry it with me everywhere.

So there they are, my favorite travel tips/ideas and accessories. I love finding a good item and telling my friends about them even more so. I hope you find these interesting enough to try for yourself. You can find these posted on my Pinterest page as well. I'd love to know if you have any of your own travel favorites. We don't travel that often, but I'm always open for a better way to do things when traveling near and far.

From my corner to yours... wishing you happy, stress free travels!!


Tuesday, February 26, 2013

Getting DIY Creative

So yesterday, I told you a little about my organizational missions, and today I want to show you know how in the midst of doing that, I found a chance to get creative and completed a dare to work on a DIY project at the same time.


So as I was on the mission of cleaning off my desk, I also realized that I needed a new desk organizer because this is what I had on my desk before the 'cleanse'. Sexy and cute, right?! Yeah, Not so much...

So where do you think I turned to?? …Yup, Pinterest - Love that place!! I searched for DIY Desk Organizers and I found a few samples of what others have done, and I picked this one out to try for myself and mixed in a little bit of this project  of tinting bottles with it.

Check out those highlighted blogs for details and further instructions but I took the information and tried to make it my own and modified it where I needed to.


I am also very big about using what I have around the house because 1.) I hate having to wait to go get what I need or 2.) I usually have something at home that will work just as well if not better.


So I did exactly that- I looked around and found a couple of salad dressing jars that look a lot like mason jars, a couple of empty Starbucks Frappuchino bottles, a vinegar/oil dispenser I wasn't using, and hot sauce bottle and a few other extra ones. I took Goo Begone to them and took off any attached labels and washed them out completely.

I followed the directions to tint my bottles and I started off with making some pink jars, then I made some light blue ones, and I figured since I was already at it I might as well make some green ones for my bathroom.

The next step was to take the colored bottles and oven bake them to make to bake in the color and and make them clear. I almost didn't believe it could be this easy, but it was!

 after 20 minutes or so @ 170 degrees.


While the jars were "cooking" I looked for a photo frame I could use as the base of my desk organizer, but instead I found the cover of a cookie tin that I used upside down. And since I didn't have any available fabric scraps for this project, I used some heavy card stock paper I had to line the bottom of it as shown.


My next step was to start adding some embellishments to the votive candle holders I wasn't tinting and the finished base. I found some twine that I hot glued around them and the tin base to give that similar rustic look from the sample I picked. 


After the jars were done, I let them cool off for a little bit and then continued to decorate them in a similar manner to complete the look I wanted which included adding some white twine to change it up.


Once I had them all decorated I hot glued them down to the base,
 filled them up with some supplies and placed it on my newly cleansed desk to use.
 Yay!


Then I took the extra bottles I had made, and put 2 of them on my bathroom as window decorations, and the 2 others are now my make up brush and cosmetic holders. They match my bathroom colors and add a nice touch!


What do you think?? Do you like these ideas?? 

Its different, totally easy to make, and it was pretty much FREE!!
The whole project took less than a couple of hours to make, and more importantly 
its all totally useful and a bit more stylish compared to what I used to have.


Would you make this for yourself? Are you inspired to try something like this?
I hope so.
Honestly, what I love about any of these ideas I see on Pinterest
is that you can always make it your own.
You just saw me take 2 simple ideas to make 1!
There are so many possibilities so there's no excuse not to try.
There is no perfection!

If this doesn't work for me in a few months, I can always try again.

From my corner to yours...wishing you some fun- find a project and get creative!

Thanks for stopping by!


Monday, February 25, 2013

Getting Organized

So on my list of things to do a few weeks ago was to get organized around my house. Not always the easiest thing to do or something I sadly don't have a lot of time for, but I am trying to gain the feeling of some control and peace by getting things in order a few things at a time.
 
My husband and I have a home office where we each have our own desk and are each responsible for its tidiness or lack there of as it were. That being said, I will be leaving my hubby's side out of today's discussion because let's just say I can only control so much ;)

I have not consistently worked in my office for over 6 months due to the fact that my desk has been a COMPLETE MESS!  I just cannot work well in that situation. So I’ve been much more comfortable working in my den, on my sofa or on the kitchen table where I know I keep my space a bit more free and clear.

So last week I took a weekend to start chipping away at this Mission Impossible….

And after a few hours on Saturday and Sunday, and a TALL basket full of waste,
 papers (and crap) I finally got it done..
OMG!!
Space! Clarity! Organization!
Freedom!!!
Now here... I can work!

Oh it was so nice to let things go, throw things away and put things in there rightful spot. I felt so accomplished getting this done, and it gave me a sense of control over my space, and THAT felt good!

So I don't know about you but once you get organizing you start finding other things to work on because you get on a roll? Well I was on one too. 

My Kitchen Pantries
So the next thing I hit up was my kitchen pantries. I got the inspiration last week as I was looking through Pinterest of course, and I found this great blog called Lewisville Love about home DIY projects where the blogger Up-cycles her pantry amongst many other wonderful projects (see for yourself.)

I loved what she did! She up-cycled plastic almond/ice-cream containers, and uses simple paint and gives you some other great ideas.  It was beautiful and clean and I wanted something similar for my kitchen and I got totally inspired...at 12:30am last Sunday night. WHAT??!!

Yup, that's how I roll. I get an idea in my head and I've got to see it through asap (and then I wonder why my Mikey is relentless??) Anyway, so at 12:30am I decide to start organizing my pantries! Unfortunately, because It was soo late when I started this mission I actually forgot to take a 'before' picture to show the difference once I was done....I just went for it! I threw all kinds of things out, recycled food boxes, washed things, rearranged, shifted ingredients from one container to another, and put like items together.  I was clinging and clanging soo much that Jerry had no idea what I was doing.

But I finished... at 2:00am!! OMG I was sooooo tired but soo exhilerated!


My pantry looked so organized and maybe even... pretty.  I don't have absolutely everything in its own glass or plastic clear container, and it will never look like the one on this blog (because they're completely different setups), but it worked for me!


 And I wasn't  going to feel like I was completely done until I got everything labeled like she had done. I really wanted to get this look!! So the next night (not as late), I took my favorite free font from Ali Edwards (available here), and I made labels on Word, printed them out on card stock, and cut them out and labeled my glass and plastic containers accordingly.


Yes, some of the stuff I labeled was pretty self explanitory as my husband pointed out. BUT as I pointed out to him, we have boys, whom in looking for something in the pantry, can look straight at it and amazingly NOT see it...so hence, I felt it very necessary to state the obvious!!

So again, this all worked really well for me. It gave me a sense of control, order and a lot of satisfaction in getting this done. We'll see how long this order lasts, but taking that step to label everything really does give me an incentive to keep it up...it just looks cool! I found a few other ideas to add order to my pantries, but I haven't had a chance to put those in place, but I will let you know when I do. That just means more projects to do...oh poor me! ;)

So I just wanted to share a little of my week's organizational "achievements," and hopefully I have inspired some of you to take the plunge to organize that something or somewhere in your own home you've been avoiding for a while. Oh come on...you know its true! Get to it!

Stop by tomorrow as I show you how after getting organized, I decide to get creative too.

From my corner to yours... may you find the will, may you find your way, and may you find a sense of accomplishment in getting rid of your own disarray. (hey, that worked out nicely- haha)

Happy Monday,


Monday, February 4, 2013

This Week...


Sometimes I have to look at my week's to do list in a different way to avoid feeling overwhelmed.


This Week...I need to structure my time to be more productive
  •  I have to clear off my desk 
  •  I have bills to pay
  •  I have to make phone calls for the family
Which means- I have to get off the computer...Soon!! ;)


This Week...I have to get things done around the house
  • I need to clean my bathrooms and vacuum
  • I need to do laundry
  • I have to hang some curtains in my room
  • Reorganize some drawers 
Which means- I have to get off the couch!


 This Week...I have some projects to finish
  • I have pictures to print and pages to do
  • I have some gifts to sew together
  • I have an assignment to complete 
Which means...I have to get motivated!


This Week...I have to continue to be active
  • I have to do my stretches 
  • I have to go on a daily 1 mile walk
  • I have to try to go to Zumba again
Which means...I have to put on my exercise shoes!

But more importantly,

This Week... I have to patiently wait for phone call that says- "Baby Jellybean is on her way!!"
  • I have to have my phone with me at all times
  • I have to be able to leave at a moments notice
  • I have to have my camera bag ready to go
Which means...I have to be ready to be an Auntie once again!!


But I am ready and so excited!! We are all excited this week as we wait for her arrival. 

Now that I can visually see what I need to get done, my goal for this week is that I can to get to as many of these as possible with a level head and hands at the ready. I want to feel accomplished and in control of the space which we all call home. And I'd like to feel like our home will be ready to welcome Baby Fea as well. (I just can't wait!) :-)

What do you have going on This Week and what does that mean for you?

From my corner to yours...May this week be a productive and happy one for you too!! ;)


Thursday, January 24, 2013

Crock Pot Cooking- BBQ Pulled Pork

Its raining today and its perfect weather for crock pot cooking! Don't you think?

I discovered the beauty of using a crock pot about 2 years ago and I can honestly say it is something I can't live without anymore. Its just too easy and convenient not to use, and to be able to take dinner off  my to do list first thing in the morning is such a blessing on busy days! There is nothing complicated or mysterious about using a crock pot, it is just a matter of having your raw ingredients and a few hours on your side and your good to go.

You just set it and forget it!  Oops, I think that's a different machine, right?  ;)

Anyway, but its true! I'm sure many of you have one and enjoy them yourselves, but since winter started I have been using mine at least once a week for different recipes, and I just thought it was the perfect day to share one of our family's favorites that I made last week during those nice cold days we just had. It was the perfect comfort food and maybe you all would like to try it too.


I've tried a few different recipes but my favorite so far has been this one which I actually cut out of a coupon insert. (See those coupon inserts do more than just save you money!)

Note: The recipe gives specific brand names for some of the ingredients but I will keep it generic because I'm sure we all have our favorite cooking brands and they all work just fine.

Ingredients
2/3 cup of Worcestershire Sauce
1/2 cup of Ketchup
1/4 cup firmly packed brown sugar
1/4 cup tomato paste
1 med. white onion, chopped
2 tbsp. yellow mustard
2 tbsp. white vinegar
Salt and pepper
4-6 thick bread rolls (Any kind) 
Your favorite BBQ sauce to top off your sandwich to taste
3 1/2 1b. boneless pork shoulder, trimmed and cut into 4 pieces
(I don't usually cut mine into pieces until a few hours into cooking- but its all preference)


One thing that I discovered in using and taking care of my crock pot are these wonderful slow cooker liners. They are heat resistant but they allow you to cook your food as normal but without the messy clean up after. You just pull the bag out and your crock pot should be dry or at least minimally dirty so you don't have to soak or scrub it too much. I highly recommend them and Target usually has them priced really well.


Directions:
First, slice openings in the pork shoulder with a knife to allow for flavors to set in. 
Salt and pepper to liking. Mix all ingredients (except bbq sauce)
 and pour over pork to make sure it covers it completely. Cook on low for 8-10 hours.


4-6 hours later, I take two forks and shred the pork within the pot, 
and mix the shredded pork with the juices to further mix and set in flavors.
 Check taste and add salt and pepper (or even some seasoned salt) as you see fit.

Depending on the tenderness of the pork I will continue to check and reshred as needed.


Serving suggestion: I like buying those nice freshly baked 6" rolls from Vallarta (aka- bolillos, some bakeries have a whole wheat option too) which you can then, lightly toast in the oven or serve soft, cut down the middle and add a hearty serving of the pulled pork with its juices for flavor. I add the BBQ sauce at the end as a topping because 2 of my boys are not crazy about it and I let the others add as much as they like.

Add some baked fries or these great baked potato wedges from Trader Joes and you've got yourself a winning dinner!!


Its super tasty and very filling and I fed my family of 5 with this recipe. The best part being that I still had enough to freeze away for another dinner or a light weekend lunch. You decide!


Anyway, there it is for you to try and play around with. You might already have your own recipe or find that you'd like to add or change up this one, but whatever you do, you can make the crock pot work for your family and help you make an easy meal on the days you need more time for other things.

I've got other great recipes I've made and will share them on occasion, but I'm ALWAYS looking for others to try. Please, please email me your favorite crock pot recipe, and I will try it and will post it on my blog and report on how it came out for us.

From my little corner to yours...Enjoy this beautiful rain and may you use your crock pot today!


email me at sandyslittlecorner@gmail.com


Friday, January 20, 2012

My projects for 2012 >>> #1 - Christmas Card Books

One of the first projects I usually try to start off with every year is doing something crafty with the Christmas cards I receive during the holidays. Our family and friends make such an effort in sending these beautiful cards out (homemade, picture and otherwise) that it just seems ungrateful to throw them out and worse yet put them away where no one will ever see them again. Don't you agree?

So in the past I have scrapbooked them in various ways into my Christmas albums, but I just haven't had the time or energy to do that in the last year. This year I decided to do something that many people are doing with their yearly cards... Christmas Card books.

Its soo easy yet still creative...Perfect!

They are just a neat way of keeping them together year by year, and you can put them out during the holidays for you and your family to look back on.

As I mentioned in my last post, I went on a little weekend getaway to Palm Springs with my family. We had a great time. A great time doing nothing much!! We rested, walked, the boys rode their scooters, we went hot tubbing, and I took the opportunity to start my creative process out there.


I went  prepared with all the necessities to take advantage of the free time I had.  I took the following things: 1.) My cards per year (including one of my own family Xmas cards, of course) 2.) a hole punch, 3.) paper cutter 4.) adhesive or glue stick 5.) 2 book rings per year 6.) decorative paper, stickers, embellishments, etc.

There are different ways of making these, but I got my inspiration from the ones my SIL has made (see her post here). But I am also a fan of Becky Higgins and last week she directed her guests to this eighteen25 blog-site  that had a FREE download and easy print out of a cover to complete my books. I've always said that scrapbooking and crafts are all about sharing ideas, so thank you to all these ladies for sharing! 

I didn't have any chip board or poster board, so I took a simple file folder (anything that is sturdy enough for a cover), and since I had 2 years worth of cards to make, the one folder was enough for both. I cut each of the file folder side in half (8 1/2" x 5 3/4") and decorated each front/back with decorative paper. I then cut out the print out and pasted it on top of each front cover.

I decorated each cover by stamping the year on each one, and added embellishments

Then I took each year's set of pictures and hole punched two openings on the left side of 
each picture that lined up to each of the red striped lines of the print out.

I bought 1" red book rings to add to the X-mas feel, and put each card in random order through the holes. I also tried putting smaller cards in the front, but random nonetheless.
Instead of book rings, you can also use red or green ribbon to hold your book together.


  And you finish it off by putting on the back decorated cover, 
and voila you're Christmas card book is done. 


 For my 2011 cards, I took the same print out, but just added some different paper 
and touches to make it a little different.


Here are my finished Christmas books for both 2010 and 2011. 
I did both in less than 2 hours (if that).


They didn't take very long to make, but I took my time looking over the cards, appreciating each one, and enjoying each step of the project, especially the decorating of each cover. It had been a long time since I had done something like this, and I truly enjoyed making each one. It felt good to have completed technically 2 projects in one. After sharing them with the boys, I was able to put them away and enjoy the rest of my getaway feeling accomplished for the weekend.

I hope that I have inspired you to make similar books with your Christmas cards. Remember that you can print up as many of those printouts to do as many books as you need. Or you can come up with your own covers. Its all about how creative you feel like being and how much time you have.

 *The truth is you can make these books for just about any occasion you get cards for (showers, weddings, birthdays, etc.) Now that I've done these, I might even do these for each of my boys birthday cards they've received over the years.
Oooh, good idea!*

Either way, I am onto choosing my next project to work on and I will share my progress as I go along.

Thank you again for stopping by, and just know that I always appreciate your thoughts and sentiments. They mean soo much to me!
 
Happy Friday to everybody, from my corner to yours...