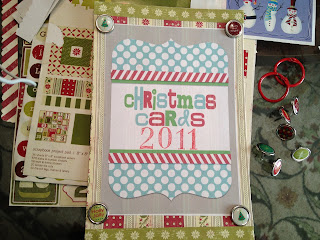
So in the past I have scrapbooked them in various ways into my Christmas albums, but I just haven't had the time or energy to do that in the last year. This year I decided to do something that many people are doing with their yearly cards... Christmas Card books.
Its soo easy yet still creative...Perfect!
They are just a neat way of keeping them together year by year, and you can put them out during the holidays for you and your family to look back on.
As I mentioned in my last post, I went on a little weekend getaway to Palm Springs with my family. We had a great time. A great time doing nothing much!! We rested, walked, the boys rode their scooters, we went hot tubbing, and I took the opportunity to start my creative process out there.

 I went prepared with all the necessities to take advantage of the free time I had. I took the following things: 1.) My cards per year (including one of my own family Xmas cards, of course) 2.) a hole punch, 3.) paper cutter 4.) adhesive or glue stick 5.) 2 book rings per year 6.) decorative paper, stickers, embellishments, etc.
There are different ways of making these, but I got my inspiration from the ones my SIL has made (see her post here). But I am also a fan of Becky Higgins and last week she directed her guests to this eighteen25 blog-site that had a FREE download and easy print out of a cover to complete my books. I've always said that scrapbooking and crafts are all about sharing ideas, so thank you to all these ladies for sharing!
 I didn't have any chip board or poster board, so I took a simple file folder (anything that is sturdy enough for a cover), and since I had 2 years worth of cards to make, the one folder was enough for both. I cut each of the file folder side in half (8 1/2" x 5 3/4") and decorated each front/back with decorative paper. I then cut out the print out and pasted it on top of each front cover.
I decorated each cover by stamping the year on each one, and added embellishments
Then I took each year's set of pictures and hole punched two openings on the left side of
each picture that lined up to each of the red striped lines of the print out.
I bought 1" red book rings to add to the X-mas feel, and put each card in random order through the holes. I also tried putting smaller cards in the front, but random nonetheless.
Instead of book rings, you can also use red or green ribbon to hold your book together.
And you finish it off by putting on the back decorated cover,
and voila you're Christmas card book is done.
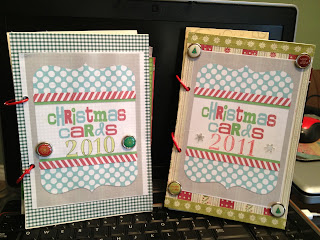
For my 2011 cards, I took the same print out, but just added some different paper
and touches to make it a little different.
Here are my finished Christmas books for both 2010 and 2011.
I did both in less than 2 hours (if that).
They didn't take very long to make, but I took my time looking over the cards, appreciating each one, and enjoying each step of the project, especially the decorating of each cover. It had been a long time since I had done something like this, and I truly enjoyed making each one. It felt good to have completed technically 2 projects in one. After sharing them with the boys, I was able to put them away and enjoy the rest of my getaway feeling accomplished for the weekend.
I hope that I have inspired you to make similar books with your Christmas cards. Remember that you can print up as many of those printouts to do as many books as you need. Or you can come up with your own covers. Its all about how creative you feel like being and how much time you have.
*The truth is you can make these books for just about any occasion you get cards for (showers, weddings, birthdays, etc.) Now that I've done these, I might even do these for each of my boys birthday cards they've received over the years.
Oooh, good idea!*
*The truth is you can make these books for just about any occasion you get cards for (showers, weddings, birthdays, etc.) Now that I've done these, I might even do these for each of my boys birthday cards they've received over the years.
Oooh, good idea!*
Either way, I am onto choosing my next project to work on and I will share my progress as I go along.
Thank you again for stopping by, and just know that I always appreciate your thoughts and sentiments. They mean soo much to me!
Happy Friday to everybody, from my corner to yours...


2 comments:
Love it!! You are inspiring me to get out my scrapbook stuff. It's been about two years since I scraped and I am missing it.
I'm so not a creative being but I may look into doing something cool next year for all the Christmas cards. They came out so cute!
Post a Comment